Cross stitch gets personal
I married my best friend last summer (2022), after 2 postponements due to COVID-19. I've also dabbled with cross stitch during the pandemic, so I decided to memorialize our union with some needlework. I recommend the incredibly powerful web-based tool, FlossCross to get started on your own design. While work is underway on my custom 200x164 pixel pattern, I decided the next round should be with my own tooling...
To simplify image manipulations, I'm using the netstandard2.0-compliant ImageSharp library from Six Labors. It's licensed under Apache 2.0 for non-commercial open-source usage.
Image to Cloth
First, we must fit the image to the desired aida cloth dimensions. Consider each square on the cloth as a pixel in the image. Aida cloth comes in a variety of densities, with 14pt being fairly standard (i.e. 14 points per inch). A 200x164 pixel image will span 14.3 by 11.7 inches of 14pt cloth, with 32,800 (cross) stitches.
public void ResizeImage(string filePath) {
  var image = LoadImage(filePath);
  var (width, height) = GetPixelDimensions(image, 14.3, 11.7, 14);
  image.Mutate(x => x.Resize(width, height));
  SaveImage(image, filePath);
}

public SixLabors.ImageSharp.Image LoadImage(string filePath)
{
  var fileStream = using File.OpenRead(filePath);
  return SixLabors.ImageSharp.Image.Load(fileStream);
}

public (int width, int height) GetPixelDimensions(SixLabors.ImageSharp.Image image, double clothWidth, double clothHeight, int pointsPerInch)
{
  if (image.Width > image.Height)
    return ((int)(clothWidth * pointsPerInch), 0);

  return (0, (int)(clothHeight * pointsPerInch));
}

public SixLabors.ImageSharp.Image SaveImage(SixLabors.ImageSharp.Image image, string filePath)
{
  using var outputFileStream = File.Create(filePath);
  image.Save(outputFileStream, new PngEncoder());
}
Colors Galore!
Resizing was easy, but we also can't cross-stitch with the full RGB color spectrum. We need to pare down the colors to a reasonably sized palette, for which we can find floss (aka 6-strand embroidery thread). Many cross-stitch patterns rely on DMC's available colors.
For example, consider this 128x128 PNG:
I created this image in Blender years ago as the icon for a Powershell GUI I was working on. It now gets a second life as a test subject.
The original image includes 1,432 distinct colors. It only required a small size adjustment to fit a standard sheet of 14pt paper (i.e. 8.5x11 inches), from 128x128 to 129x129.
These versions includes 100, 10 and 4 colors respectively:

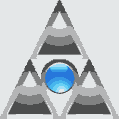

You may notice the background is transparent in the original but not in the resized versions. Working with the alpha channel is a future exercise.
Fixing the Rainbow
Imagine each color as a point in a 3-dimensional vector space defined by the 3 color components: red, green, and blue. We want an algorithm that will identify n points such that each final color is closest to all of the original colors nearest it.
The process will essentially be:
pick
xpoints within the color domain0<=r<=255; 0<=g<=255; 0<=b<=255;assign all colors from the original image to one of the
xgroups, based on how close they are in 3D spaceidentify the centroid of each color group
reassign colors between each group, based on how close they are to each other group's centroid
repeat steps 3 & 4 until all colors remain in their groups
replace every pixel in the original image with the centroid of their respective color group
save
e.g. what colors will best condense this 4 color image?

The original includes the following (r,g,b) points:
Red: (255, 0, 0)
Orange: (255, 128, 0)
Blue: (0, 0, 255)
Green: (0, 255, 0)
The 2-color reduced image includes just:
Less-red-orange: (170,128,0)
Blue: (0, 0, 255)

The 3-color reduced image includes:
Less-green-orange: (255,64,0)
Blue: (0, 0, 255)
Green: (0, 255, 0)

I imagine there are far more efficient methods for grouping these colors but I have an iterative approach that should (🤞) work. First, we need a matrix with the distance between each pixel relative to each other pixel. The distance between points in 3 dimensions is calculated with the formula:
public double GetDistance(Rgb24 first, Rgb24 second) {
  var redDistanceTerm = Math.Pow(second.R - first.R, 2);
  var greenDistanceTerm = Math.Pow(second.G - first.G, 2);
  var blueDistanceTerm =Math.Pow(second.B - first.B, 2);;
  return Math.Sqrt(redDistanceTerm  + greenDistanceTerm  + blueDistanceTerm);
}
For n pixels, this process will result in an n by n matrix. For example, the distance matrix for the following 3 pixels:
var pixels = new Rgb24[3] {
  new Rgb24(r:   0, g: 100, b: 200),
  new Rgb24(r: 100, g: 200, b:   0),
  new Rgb24(r:  50, g:   0, b: 100)
};
var distanceMatrix = new double[3,] {
  [    0,  245, 150 ],
  [ -245,    0, 150 ],
  [ -150, -150,   0 ]
};
The diagonal (i.e. the distance from a pixel to itself) will always be filled with zeroes while the bottom and lower triangular regions will be negations of one another, encoding the distance and direction. To populate the matrix less than half the cells 0.5*(n^2 - n) need to be computed, just a single triangular region.
private static double[,] GetDistanceCorrelationMatrix(List<Rgb24> pixels)
{
    var matrix = new double[pixels.Count, pixels.Count];
    for (var i = 0; i < pixels.Count; i++)
    {
        var currentPixel = pixels[i];

        // "walk" behind the first iterator of the pixel array
        // measuring distance between each prior pixel  & 'currentPixel'
        // skipping a comparison of 'currentPixel' to itself
        for (var j = 0; j < i; j++)
        {
            var rawDistance = GetDistance(currentPixel, pixels[j]);
            matrix[j, i] = rawDistance;
            matrix[i, j] = rawDistance * -1;
        }

        matrix[i, i] = 0;
    }

    return matrix;
}
Now to identify the groups for each pixel that will define the x replacement colors, using recursion. We're searching for the center of x unknown groupings. Since we want these to be as far apart from one another as possible -- to maximize the final color range -- an initial guess for each group could be which of the original pixels are furthest from one another. Locating the first 2 initial guesses is straightforward:
private static int[] GetInitialReferenceIndexes(List<Rgb24> pixels, double[,] correlationMatrix)
{
    var greatestDistance = -1.0d;
    var initialReferenceIndices = new int[2];

    for (var col = 0; col < pixels.Count; col++)
    {
        for (var row = col; row < pixels.Count; row++)
        {
            var distance = Math.Abs(correlationMatrix[col, row]);
            if (distance > greatestDistance)
            {
                greatestDistance = distance;
                initialReferenceIndices[0] = col;
                initialReferenceIndices[1] = row;
            }
        }
    }

    return initialReferenceIndices;
}
For the other initial guesses, loop through the remaining pixels to find which are furthest from the already identified reference pixels.
private static List<int> GetReferenceIndexes(List<Rgb24> pixels, double[,] correlationMatrix, int numberOfPoints)
{
    var referenceIndices = GetInitialReferenceIndexes(pixels, correlationMatrix).ToList();

    while (referenceIndices.Count < numberOfPoints) {
        var furthestPixelIndex = FindPixelFurthestFromAllReferenceIndexes(pixels, correlationMatrix, referenceIndexes);
        referenceIndices.Add(furthestPixelIndex);
    }

    return referenceIndexes;
}

private static int FindPixelFurthestFromAllReferenceIndexes(List<Rgb24> pixels, double[,] correlationMatrix, IEnumerable<int> referenceIndexes)
{
    return pixels
        .Select((_, i) =>
        {
            if (referenceIndexes.Contains(i))
                return (PixelIndex: i, AverageDistance: 0);

            return (PixelIndex: i, AverageDistance: referenceIndexes.Select(r => Math.Abs(correlationMatrix[r, i])).Average());
        })
        .OrderByDescending(t => t.AverageDistance)
        .First().PixelIndex;
}
Next up, is populating each group with the pixels closest to each initial guess:
private static List<List<Rgb24>> GetGroupsAroundNFurthestPoints(List<Rgb24> pixels, int numberOfPoints)
{
    var correlationMatrix = GetDistanceCorrelationMatrix(pixels);
    var referenceIndices = GetReferenceIndexes(pixels, correlationMatrix, numberOfPoints);
    var groupMap = referenceIndices.ToDictionary(r => r, r => new List<Rgb24>
    {
        pixels[r]
    });

    // fill groups with closest pixels
    foreach (var i in Enumerable.Range(0, pixels.Count).Except(referenceIndices))
    {
        var point = pixels[i];
        var closestReferencePointIndex = referenceIndices
            .Select(r => (Index: r, Distance: Math.Abs(correlationMatrix[i, r])))
            .OrderBy(t => t.Distance)
            .First().Index;

        groupMap[closestReferencePointIndex].Add(point);
    }

    return groupMap.Values.ToList();
}
At this point, we have n groups comprising all colors present in the original image. So what color does each group represent? That's where the centroids come in. In this context, a centroid would be the RGB point which minimizes the distance between each other point within a grouping; i.e. a group's "central color." A centroid is determined mathematically from the average value of each dimension.
// centroid = (avg(x_1 + x_2 + ... + x_n), avg(y_1 + y_2 + ... + y_n), avg(z_1 + z_2 + ... + z_n))
private Rgb24 GetCentroid(IEnumerable<Rgb24> pixels)
{
    var (redValues, greenValues, blueValues) = GetValuesFromEachDimension(pixels);
    var redAverage = (byte)redValues.GetAverage();
    var greenAverage = (byte)greenValues.GetAverage();
    var blueAverage = (byte)blueValues.GetAverage();

    return new Rgb24(redAverage, greenAverage, blueAverage);
}

private static (IEnumerable<int> redValues, IEnumerable<int> greenValues, IEnumerable<int> blueValues) GetValuesFromEachDimension(IEnumerable<Rgb24> pixels) => (
    pixels.Select(p => (int)p.R),
    pixels.Select(p => (int)p.G),
    pixels.Select(p => (int)p.B)
);
Since we want each color group to contain the colors closest to one another, we must reassess which pixels live within each group using their centroids as reference. Since the centroids will shift as pixels are added and removed from groups, the rebalancing process will be iterative, stopping once all pixels remain in their groups.
private static List<List<Rgb24>> RebalanceIterative(List<List<Rgb24>> groupings)
{
    var balancedGroups = groupings;
    var aPixelShifted = true;

    while (aPixelShifted)
        balancedGroups = Rebalance(balancedGroups, out aPixelShifted);

    return balancedGroups;
}

private static List<List<Rgb24>> Rebalance(List<List<Rgb24>> groupings, out bool aPixelShifted)
{
    var centroids = groupings.Select(g => g.GetCentroid());
    var pixels = groupings.SelectMany(g => g).ToList();
    var correlationMatrix = GetDistanceCorrelationMatrix(centroids.Concat(pixels).ToList());
    var newGroups = GetInitializeGroupList(groupings.Count);
    aPixelShifted = false;

    for (var pixelIndex = 0; pixelIndex < pixels.Count; pixelIndex++)
    {
        var currentLeastDistance = double.MaxValue;
        var leastDistanceGroupIndex = -1;
        for (var groupIndex = 0; groupIndex < groupings.Count; groupIndex++)
        {
            var rowIndex = pixelIndex + groupings.Count;
            var distance = Math.Abs(correlationMatrix[groupIndex, rowIndex]);
            if (distance < currentLeastDistance)
            {
                currentLeastDistance = distance;
                leastDistanceGroupIndex = groupIndex;
            }
        }
        newGroups[leastDistanceGroupIndex].Add(pixels[pixelIndex]);

        if (!groupings[leastDistanceGroupIndex].Contains(pixels[pixelIndex]))
            aPixelShifted = true;
    }

    return newGroups.ToList();
}

private static List<Rgb24>[] GetInitializedGroupList(int groupCount)
{
    var groups = new List<Rgb24>[groupCount];
    for (var i = 0; i < groupCount; i++)
        groups[i] = new List<Rgb24>();

    return groups;
}
Once the groups are rebalanced, their final centroid values represent the "best" color such that each color in the reduced color set is as far from each other final color, while representing every color present in the original image. All that remains is to remap every pixel in the original image to their group's corresponding centroid.
private void AdjustColors<Rgb24>(IS.Image<Rgb24> image, List<ColorGroup<Rgb24>> colorSet)
{
    for (var rowIndex = 0; rowIndex < image.Height; rowIndex++)
    {
        for (var columnIndex = 0; columnIndex < image.Width; columnIndex++)
        {
            var currentColor = image[columnIndex, rowIndex];
            var colorGroup = colorSet.Single(g => g.Contains(currentColor));
            image[columnIndex, rowIndex] = colorGroup.Centroid;
        }
    }
}
Are these colors really the best?
It depends on your use case. If you simply desire colors furthest from one another, then yes. But generally speaking, the colors present in an image aren't uniformly distributed. Any skew in the input data will be represented in the result of the above algorithm, so the resulting image may not be the most visually appealing. For example, let's assume an input image with 98 shades of red and a single shade each of blue and green, reduced to 3 colors. The result may just be 3 shades of red, effectively removing the contrast present in the original image. This is because whichever groups contain the blue and green pixels will have a centroid pulled strongly to the red spectrum. A visual representation should give a better understanding of what's going on, and how we might correct for this skew.
Building the test case
We might as well generate this test image to work with later. I should mention, I love the terminal, especially PowerShell -- which is now open-source and cross-platform -- so I'll use any excuse to use a command-line tool. Enter ImageMagick.
Like the previous (tiny) images earlier, I'll generate an image with each color side-by-side. From left to right, we'll have a rectangle comprised of 98 different shades of red, another filled in blue, and a third in green. In order to get a sufficient amount of red in the blue & green such that they're pulled into the red spectrum, we can't just use pure colors. If we did, all 98 reds might end up in the same group and contrast would be preserved.
The strategy will be to use a slightly reddish blue and green, as well as pure red. These 3 colors will be farthest apart and thus form the basis of our initial groupings. To ensure the blue and green are pulled to the red spectrum, we'll need a fair number of red shades which are closer to each respectively than they are to pure red. To get started, this script will generate 41 of these reddish colors along a line between pure red & our green, as well as pure red & our blue. An additional 15 colors are generated nearer pure red, just to round out the 100.
$blueShade = New-Object PSCustomObject -Property @{ r=50; g=0; b=150; }
$greenShade = New-Object PSCustomObject -Property @{ r=50; g=150; b=0; }
$redBlueCutoff = New-Object PSCustomObject -Property @{ r=150; g=0; b=75; }
$redGreenCutoff = New-Object PSCustomObject -Property @{ r=150; g=75; b=0; }
$redPure = New-Object PSCustomObject -Property @{ r=255; g=0; b=0; }

$blueGroup = New-Object System.Collections.Generic.List[PSCustomObject]
$greenGroup = New-Object System.Collections.Generic.List[PSCustomObject]
$redGroup = New-Object System.Collections.Generic.List[PSCustomObject]
$redGroup.Add($redPure)

for ($i = 0; $i -lt 41; $i++) {
    $blueGroup.Add($( New-Object PSCustomObject -Property @{ r=$redBlueCutoff.r; g=$redBlueCutoff.g; b=($redBlueCutoff.b + $i); } ))
    $greenGroup.Add($( New-Object PSCustomObject -Property @{ r=$redGreenCutoff.r; g=($redGreenCutoff.g + $i); b=$redGreenCutoff.b; } ))

    if ($i -lt 7) {
        $redGroup.Add($( New-Object PSCustomObject -Property @{ r=$redPure.r; g=($redPure.g + (($i + 1) * 8)); b=$redPure.b; } ))
        $redGroup.Add($( New-Object PSCustomObject -Property @{ r=$redPure.r; g=$redPure.g; b=($redPure.b + (($i + 1) * 8)); } ))
    }
}

$redGroup.Add($( New-Object PSCustomObject -Property @{ r=$redPure.r; g=($redPure.g + (8 * 8)); b=$redPure.b; } ))
$redGroup.AddRange($blueGroup)
$redGroup.AddRange($greenGroup)

# $redGroup contains all 98 shades of red
Now to generate an image such that we have 2 reddish columns, each 10 pixels wide and 490 pixels in height -- this provides a patchwork of reds with each plot 10x10 in size. Two additional 10x490 pixel columns are then appended to the right of the reds, one for our green, and another for our blue. The result is a 40x490 pixel image with 100 individual colors.
function Get-RectangleDrawCommand {
    param(
        [Parameter(Mandatory=$true)][PSCustomObject]$color,
        [Parameter(Mandatory=$true)][int]$XCoordinate,
        [Parameter(Mandatory=$true)][int]$YCoordinate,
        [Parameter(Mandatory=$true)][int]$PlotHeight,
        [Parameter(Mandatory=$true)][int]$PlotWidth
    )

    $colorString = "rgb($($color.r),$($color.g),$($color.b))"
    $bottomCornerXCoordinate = $XCoordinate + $PlotWidth
    $bottomCornerYCoordinate = $YCoordinate + $PlotHeight
    $rectangle = "rectangle $XCoordinate,$YCoordinate $bottomCornerXCoordinate,$bottomCornerYCoordinate"
    $cmd = "-fill '$colorString' -draw '$rectangle'"

    return $cmd
}

$outputFile = "contrast-test-image.png"
$baseCommand = "& magick.exe convert -size 40x490 xc:white"
$drawCommands = New-Object System.Collections.Generic.List[string]

for ($i = 0; $i -lt 49; $i++) {
    $yCoord = $i * 10
    $leftColor = $redGroup[$i]
    $rightColor = $redGroup[$i + 49]

    $drawCommands.Add($(Get-RectangleDrawCommand $leftColor 0 $yCoord 10 10))
    $drawCommands.Add($(Get-RectangleDrawCommand $rightColor 10 $yCoord 10 10))
}
$drawCommands.Add($(Get-RectangleDrawCommand $greenShade 20 0 490 10))
$drawCommands.Add($(Get-RectangleDrawCommand $blueShade 30 0 490 10))

$drawCommandsString = [System.String]::Join(" ", $drawCommands)
$command = "$baseCommand $drawCommandsString $outputFile"

Invoke-Expression $command
And now for the generated test image:

And here it is after processing through the algorithm above, with a reduction to 3 colors:

Pretty bland, right? To get a better understanding, we can take a peek behind the scenes.
Let's get visual!
With some alterations, we can capture diagnostics data during the color reduction which can be rendered with Plotly. The following 3D plot shows the 100 pixels, as well as where each group is centered for each iteration.
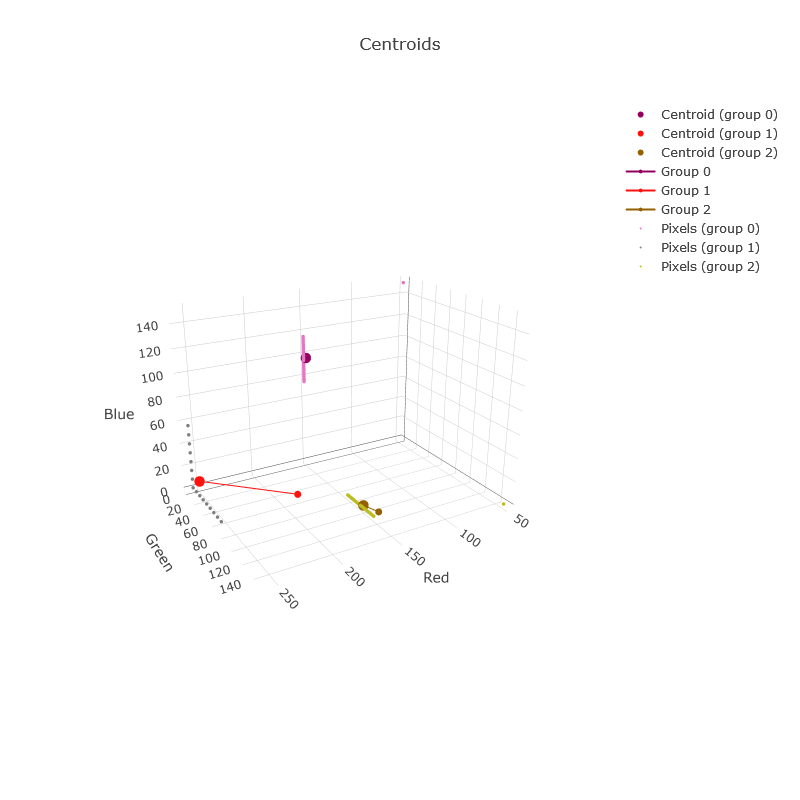
Due to the simplicity of this example, the algorithm took just 2 iterations, which can be seen by the red & greenish-yellow groups shifting along a straight path. The largest circles represent the final 3 colors, with the medium circles being the initial guesses. The smallest circles represent each of the 100 initial colors, which are aligned in straight lines, displaying the pattern used to generate the test image. Note the 2 small dots in the green & blue corners, which are no longer represented in the final reduced image. Now that we can see what's happening, how can we alter the algorithm to better incorporate those 2 extremes?
I reckon it's fair to ignore extreme colors if they're only shown in a few pixels of an image. However, the blue & green present in our original represents 50% of the total image's color. One method to preserve contrast could be to weigh each color in the algorithm based on how many pixels exist of that color.
To be continued...